Bangla Font Installation
The windows operating system comes with a full set of default font. But if we need more fonts / Bangla fonts we have to install that font in our windows OS, after that we can use that font. Font installation is quite simple in Windows operating systems. Here we are giving step by step procedure for font installation.
A. Install Bangla Fonts in Windows 11, 10, 8, 7, Vista, XP
Method - I
Step I: Download Bengali (Bangla) font from given link.
Step II: After download the zip file -> Extract it -> Now you will found .ttf file
Step III: Double click on .ttf font file -> When the file in open it shows a button for install
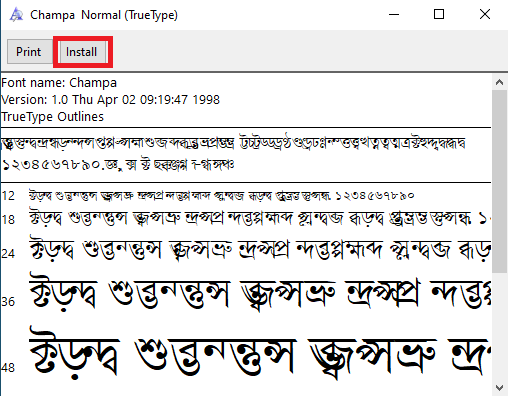
Step IV: Click on "install" button the font will be install on your system and now you can select the Bangla font in MS Word or type in Bengali font.
(Note : For Type in Unicode Bangla font you have to download and install Bangla Typing Software also)
Method - II
Step I: Download Bangla Font from given link.
Step II: After download the zip file -> Extract it -> Now you will found .ttf file
For Windows 11, 10
Step III: Now go to Start -> Settings -> Search for Fonts -> Paste the font file
For Windows 8, 7, XP
Step III: Now go to Start -> Control Panel -> Fonts -> Paste the font file
Step IV: You done all thing now go to MS word select the name of the font from drop down list and type in that font.
B. Install Bangla Font in MacOS
Step I: Open "Font Book". Use Spotlight to find "Font Book" application (Cmd + Space, then type "Font Book").
Step II: Go to "File" and select “Add Fonts” (or simply drag & drop the downloaded font files into the Font Book window).
The fonts will be added to Font Book and installed on your system.
C. Install Bangla Font in Linux
Step I: Open a file manager and navigate to the folder containing the downloaded font files.
Step II: Right-click on each font file and select "Open with Font Viewer."
Step III: In the Font Viewer, click the "Install" button to install the font.
After install fonts let follow these steps to use Bangla fonts:
Step 1. Restart Applications
After installing the required Bangla fonts, it’s a good idea to restart the applications in which you want to use them. This will ensures that the newly installed fonts are recognized and available for use in those applications.
Step 2. Test Your Bangla Fonts
After successful installation of Bangla fonts on your system. To test them, open a text editor (Notepad etc.) or a word processing application (MS Word etc.) and select the newly installed font from the dropdown list.
For Non-Unicode Bangla Font
Start typing and make sure that the fonts are displaying correctly.
For Unicode Bangla Font
If you select the Unicode Bangla font name and directly start typing will see English character instead of Bangla characters. To be able to type in Unicode Bangla font, firstly you have to activate Bangla language (or keyboard) from the language bar.
How to check font is Unicode or non Unicode ?
It's very simple, just double click on the font file (.ttf) and see the character are appearing in Bangla language or English; If the character are appearing in Bangla than it's a non-Unicode font and if the character are appear in English alfa bate than it is a Unicode font.
Free download software for open (extract) zip file